How to Transcribe Audio to Text Privately Online
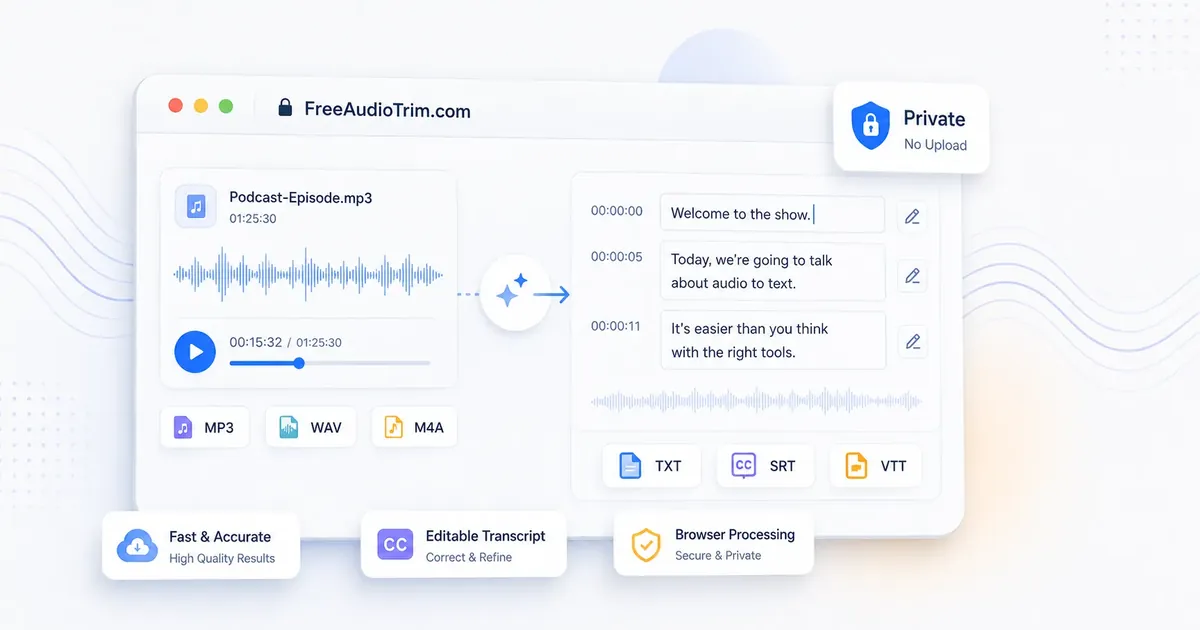
Audio transcription turns audio into editable text. The real work happens before and after the first draft. Start with the clearest source you have, cut the sections you do not need, then review names, numbers, speaker changes, and unclear phrases against the recording. This guide is for anyone who needs to transcribe interviews, meetings, lectures, podcasts, or voice notes into reliable text without installing software or uploading files to a server.
Transcription of Audio Files to Editable Text
The Audio and Video Transcription tool converts speech from audio and video files into editable text, timed subtitles, and downloadable caption files, all processed locally in your browser. The steps below cover everything you need to transcribe audio to text and get a clean, reviewable result. Start with the best source file you have, prepare it before running the tool, and review the output before exporting. Skipping the preparation steps is the most common reason a transcript needs heavy correction afterward.
Step 1: Choose the Cleanest Source File
Use the original recording if you have it. WAV can be a strong working format when file size is acceptable, while MP3 and M4A are common for voice notes, meetings, podcasts, and shared recordings. If the audio comes from a video, use Extract Audio from Video first when you only need the soundtrack.
Step 2: Remove Sections You Do Not Need
Cut setup chatter, long endings, repeated false starts, or unrelated sections before transcription. Trim audio down to what actually matters. Shorter, focused audio is easier to process and much faster to review afterward.
Step 3: Remove Long Silence Carefully
Use Remove Silence from Audio when the recording has long gaps, dead air, or extended pauses. Keep the settings conservative. If you cut too aggressively, you can remove quiet words or sentence endings and make the transcript worse.
Step 4: Normalize Uneven Speech Volume
If one speaker is much quieter than another, run Normalize Audio Volume before transcription. More consistent volume can make listening and review easier, especially for interviews, lectures, and podcasts. Normalization helps level, but it does not remove noise, echo, or overlapping speech.
Step 5: Clean Rough Voice Recordings When Needed
If the recording is understandable but still noisy, thin, or boxy, clean the voice first with AI Voice Studio. That is especially useful for phone mics, laptop recordings, draft voiceovers, and interview audio that needs clearer speech before transcription review.
Step 6: Generate the Transcript
Open the transcription tool, choose your prepared file, select the spoken language, and pick an available model. On the first run, the browser downloads the model. Longer desktop recordings are processed in overlapping windows so words near a split are less likely to disappear. The browser rejects decoded audio shorter than one second. It mixes stereo or multichannel audio to mono and resamples it to 16 kHz before inference. Phone mode uses an equal-power left and right mix. Other multichannel files are averaged across their channels.
A live preview appears while the file is being processed. It is provisional, not microphone dictation. The final text may change when the tool removes duplicate lines or retries a difficult section. The tool also has an optional Enhance audio setting. It raises a quiet waveform through peak normalization before transcription. It does not remove background noise, music, echo, or overlapping voices.
Step 7: Edit Before Export
Use the built-in player to listen while the current transcript segment is highlighted. Click a segment to jump to that part of the recording, select Edit transcript, and correct the words in place. Review proper names, brand names, numbers, quotations, and unclear phrases. The tool does not identify speakers or let you rewrite timestamp values, so add speaker names later if your project needs them.
Your edits become the source for copied text, downloads, and translation. This is worth doing before translation because a mistranscribed name or number will otherwise become a translation problem too.
Step 8: Export the Right Format
Choose TXT when you need plain transcript text for notes, search, summaries, or article drafts. Choose SRT when you need subtitle timing for YouTube, Premiere Pro, DaVinci Resolve, Final Cut workflows, or social video publishing. Choose VTT for websites and web players. Hiding timestamps makes the on-page transcript easier to read, but SRT and VTT downloads remain timed because timing is part of those formats.
Translate or Refine the Corrected Transcript
After editing, you can translate the transcript between 20 supported languages. The tool opens a temporary translation page, sends only the transcript lines through Google Translate, and keeps the page controls and timestamps out of the translation. The translated result can be downloaded as TXT, SRT, or VTT. The Refine with ChatGPT button opens the Subtitle Translator custom GPT. It does not copy or send your transcript. You choose what to share, review the response, and bring back any changes you want to keep.
TXT, SRT, and VTT: Choosing the Right Format
TXT is the simplest export. It contains the words without subtitle timing, so it works well for notes, quotes, meeting summaries, podcast show notes, and searchable archives. SRT includes numbered subtitle blocks with start and end times. It is widely supported by video platforms and editors, making it the safest subtitle export for many production workflows. VTT is a timed caption format commonly used on websites and web video players. Use it when your destination asks for WebVTT captions or when subtitles will live inside a web playback experience.
When to Transcribe Your Audio
Use this workflow when you need a practical first draft of spoken content that you can search, quote, subtitle, or repurpose. It is useful for recorded interviews, client calls, team meetings, classroom lectures, webinars, podcasts, voice notes, research recordings, and content drafts.
It is also helpful when privacy matters. Client footage, unpublished podcast interviews, research audio, internal meetings, and personal voice notes often should not be uploaded casually. A local browser workflow keeps supported files on your device while still giving you transcript and subtitle exports.
How the Transcription Tool Works
When you transcribe audio to text, the tool does more than simply recognize speech. Before transcription begins, it checks whether your browser and device can run the selected AI model, prepares the audio for processing, and performs everything locally in your browser. These checks help keep transcription stable while matching the best available model to your device.
What the Tool Checks Before It Starts
Before processing begins, the tool confirms that your browser supports the features needed for local transcription. It checks for Web Workers, WebAssembly, and browser audio processing support. It also reviews available memory, CPU threads, screen type, and WebGPU support before deciding which AI models your device can handle.
You may see up to three model options. Baby Raptor uses Whisper Base and is the lightest model. Triceratops uses Whisper Small and offers a balance between speed and accuracy for most desktop computers. T Rex uses Whisper Large V3 Turbo and is available only on devices that pass additional hardware checks. Larger models often improve transcription accuracy, but they also require more memory and processing power.
The language you choose also matters. Selecting the spoken language reduces guessing and helps improve accuracy, especially for short recordings, strong accents, Arabic audio, or conversations that switch between languages.
How the Hardware Check Chooses a Safe Model
The tool starts with a basic compatibility check. Your browser must support Web Workers, WebAssembly, and AudioContext before local transcription can run. For desktop devices, Triceratops is available only when the browser reports enough memory and CPU threads. Tablets with touch focused hardware need slightly higher resources before the model becomes available.
T Rex goes through additional testing. The browser checks for a supported WebGPU adapter, available memory, CPU resources, GPU buffer capacity, and storage limits before enabling the model. Apple desktops qualify through a separate hardware check designed for Apple silicon devices. These checks are intentionally conservative. If T Rex becomes unstable or fails to load, the tool automatically switches to Triceratops. If needed, it falls back again to Baby Raptor so transcription can continue instead of failing completely.
Where the Model Comes From and Where It Runs
The transcription models are downloaded from trusted online repositories the first time you use them. Desktop browsers load Transformers.js from jsDelivr and Whisper models from Hugging Face. Phone mode uses a lighter Whisper Base model designed for mobile devices. After the download finishes, the model runs inside a Web Worker in your browser. Your audio stays on your device during transcription. Downloading the AI model is separate from uploading your recording.
Desktop browsers can reuse previously downloaded models from the browser cache to reduce future loading times. Safari handles caching differently for stability, while mobile browsers use their own loading process. Once a transcription session finishes, the model usually stays in memory for a short time before it unloads automatically. To avoid using unnecessary system memory, FreeAudioTrim allows only one browser tab to hold an active transcription model at a time. If another tab is already using the model, the current tab waits until those resources become available.
File Length Limits on Phones and Computers
Phone mode supports Baby Raptor only. Depending on your device, recordings can be up to 90, 120, or 150 seconds long. The browser estimates your device's capabilities before deciding which limit applies.
Desktop limits depend on the selected model. Baby Raptor supports recordings up to 20 minutes, Triceratops supports up to 15 minutes, and T Rex supports up to 10 minutes. For longer recordings, choosing a lighter model may be the better option even if your computer can run a larger one.
What the Status Messages Are Telling You
The status messages show which stage of transcription is currently running. They can also help explain why processing may take longer for some recordings.
Preparing or downloading a model
The browser checks whether the selected AI model is already available. If it is not, the required files are downloaded before transcription begins.
Preparing audio
Your recording is decoded, converted to mono when needed, and resampled to 16 kHz so it matches the format required by the transcription model.
Analyzing speech regions
The tool identifies spoken sections and prepares timing information before speech recognition starts.
Transcribing
For longer recordings, the audio is processed in smaller sections. If one section is difficult to recognize, the tool may retry it before continuing.
Finalizing transcript
The completed transcript is merged, duplicate overlap is removed, and timestamps are checked before the final result appears.
You may also see warnings when speech quality is poor, a device reaches its processing limits, or the tool selects a safer model to improve stability. When possible, the original file stays loaded so you can retry without starting over.
Full status and progress message reference
Getting Started
- Upload a file to begin transcription
- Audio ready for transcription. Choose the spoken language.
- Audio ready for transcription. Press Transcribe to load the selected model locally and start.
- The selected model is ready, with the current device limit shown.
- The selected model could not be prepared last time. Press Transcribe to retry.
- The selected model is disabled on this device, followed by the reason.
Model Setup
- Preparing the selected model
- Checking your cached AI model so transcription can stay local in this browser
- Downloading the selected model, with a percentage
- Finalizing the selected model in your browser
- Model files downloaded. Finishing browser setup
- Another transcription tab is holding the AI model
- Failed to prepare the selected transcription mode
- Failed to load AI model. Check your internet connection
Audio Processing
- Preparing audio
- Analyzing speech regions
- Checking speech timing
- Transcribing in browser, sometimes with a percentage
- Receiving live transcript
- Still transcribing
- Transcribing a numbered window or part
- Transcribing smaller windows for a difficult region
- Retrying a difficult region or the first split as micro-windows
- Recovering speech after a repeated intro loop
- Finalizing transcript
Results and Troubleshooting
- Transcript ready or Transcription complete
- Audio enhanced for better accuracy
- Review repeated sections, weak speech, unstable mobile output, or the selected language
- No clear speech detected. Try Enhance audio or use a cleaner recording
- Unsupported or corrupted file
- Your browser does not support audio processing
- Only one file can be processed at a time
- Transcription failed. Try a shorter or clearer file
- The file is over the current model and device limit
- The previous run was reset while keeping the file loaded
- The worker stopped, ran out of memory, or could not communicate
- T Rex could not use WebGPU or became unstable, followed by a safer-model retry
Privacy and Local Processing
This free tool processes supported audio files locally in your browser. Your recording stays on your device while transcription runs. The only download is the AI model your browser needs to perform speech recognition.
Translation works differently. If you choose to translate your transcript, only the transcript text is sent through Google Translate. Your audio file is never included in that step.
Creating Subtitles From Audio Files
Once your audio has been transcribed, you can turn the timed transcript into subtitle files without creating a video first. This is useful for podcasts, webinars, voiceovers, online courses, interviews, and any project that needs captions before video editing begins. Choose SRT when you need subtitles for YouTube, Premiere Pro, DaVinci Resolve, Final Cut Pro, or most video editing software. Choose VTT when your captions will be used on websites or in web based video players.
Before exporting, review the transcript carefully. Check names, numbers, punctuation, and subtitle timing while listening to the recording. Small corrections at this stage help produce captions that are easier to read and more accurate when published.
Accuracy and Review Checklist
Automatic transcription works best when the recording is clear. A single speaker, a good microphone, and a quiet environment usually produce the most accurate results. Background noise, echo, music, overlapping voices, fast speech, strong accents, and heavy audio compression can all reduce accuracy. Accuracy is often measured using Word Error Rate, or WER. It compares the transcript with a verified reference to estimate how many words were added, missed, or transcribed incorrectly. While useful for benchmarking, WER does not always reflect how readable or usable a transcript is in real situations.
Speaker overlap remains one of the biggest challenges for speech recognition. When two or more people talk at the same time, words may be missed or merged together. Audio cleanup can improve listening quality, but it cannot recover speech that was never recorded clearly. Always review the transcript while listening to the original recording. Check names, numbers, quotations, technical terms, and unclear phrases before exporting or publishing. If the transcript will be used for client work, subtitles, research, education, accessibility, or legal documents, a complete manual review is essential.
Language Support and Accuracy
The transcription tool supports around 100 languages, but accuracy is not the same across every language. Recording quality, accents, dialects, and the amount of training data available for each language all influence the final transcript. Selecting the correct spoken language before transcription helps improve recognition and reduces unnecessary mistakes.
Arabic Audio and Dialect Considerations
The tool can transcribe Arabic recordings, including conversations that mix Arabic and English. When Arabic is selected, the model is prompted to transcribe speech instead of translating it, preserve English words as spoken, use punctuation where appropriate, and identify music when detected.
Even with these improvements, dialects, regional vocabulary, code switching, names, and local expressions may still require manual review. Check both the wording and subtitle timing carefully before exporting captions for publication.
Which Languages Work Best
The transcription model generally performs best in English and other well represented languages such as Spanish, French, German, Portuguese, Italian, and Dutch. Clear Modern Standard Arabic can also produce strong results when Arabic is selected before transcription begins.
Languages with less training data may produce more recognition errors, especially in recordings with background noise, strong regional accents, or technical vocabulary. When available, choose the most capable model for these recordings and review the transcript carefully before using it.
Common Mistakes
Even the best transcription tool cannot fix problems caused by poor preparation. Avoid these common mistakes to save time during editing and improve the final transcript.
Transcribing Noisy Recordings Without Preparation
If the recording contains long pauses, uneven volume, or distracting noise, clean it first. Simple preparation often produces a more accurate transcript and reduces manual corrections later.
Removing too Much Silence
Silence removal can speed up review, but aggressive settings may cut off quiet words or the ends of sentences. Keep the settings conservative when speech quality matters.
Choosing the Wrong Spoken Language
Always select the language used in the recording before starting transcription. This helps the model recognize speech more accurately, especially for short clips, accents, and multilingual conversations.
Skipping the Review Step
Automatic transcription creates a strong first draft, but it is not the final version. Listen to the recording and verify names, numbers, quotations, technical terms, and unclear phrases before exporting.
Using the Wrong Export Format
Choose TXT for notes, summaries, and searchable text. Use SRT for most subtitle workflows and VTT when captions will be published on websites or web based video players.
Expecting Perfect Results from Difficult Audio
Background noise, echo, overlapping speakers, distant microphones, and strong accents can all reduce transcription accuracy. The clearer the recording, the better the final result.
Start With the Recording You Already Have
You do not need a perfect recording to transcribe audio to text. Start with the clearest version you have, remove anything that is not needed, and generate the first transcript. A few minutes spent reviewing names, numbers, and unclear phrases will usually produce a reliable final result. If your recording contains long pauses, uneven volume, or unnecessary sections, prepare it before transcription. Trimming the audio, removing silence, or normalizing volume can make both transcription and review easier. When you are ready, open Audio and Video Transcription, generate your transcript, and export it as TXT, SRT, or VTT depending on how you plan to use it.
FAQ
Can I transcribe MP3, WAV, or M4A files?
Yes. MP3, WAV, and M4A are common transcription sources, along with other supported browser audio formats. If a file does not open, convert it to a more compatible format first.
Can I transcribe interviews?
Yes. Interviews are one of the best uses for transcription. Try to record each speaker clearly, reduce background noise, and review speaker turns before quoting the transcript.
Can I transcribe meetings?
Yes, but meeting accuracy depends heavily on microphone placement and speaker overlap. A single laptop microphone across a noisy room will be harder to transcribe than a clear conference recording.
Can I transcribe lectures?
Yes. Lecture transcription works best when the speaker is close to the microphone and the room is not echoey. Review technical terms, names, dates, and formulas carefully.
Can I transcribe podcasts?
Yes. For podcasts, trim intros or ads if you do not need them, remove long gaps if useful, normalize volume, then export TXT for show notes or SRT/VTT for clips and videos.
Is private transcription better for client recordings?
For sensitive client work, a local no-upload workflow is often a better first choice because supported files stay on your device. You still need to follow your own client agreements, legal requirements, and internal privacy rules.
What should I check before using the transcript?
Check names, quotes, numbers, jargon, unclear sections, and subtitle timing. The tool does not create speaker labels, so add them yourself when the recording has several people. If the transcript will be published, watched, quoted, or sent to a client, manual review is part of the job.